Manual
Setup
Setup is a one-time process. After a successful setup, everything works automatically each time you start FL Studio.
System Requirements
- Operating System: Windows, macOS
- Maschine: Plus, MK3, Mikro MK3, MK2, Mikro MK2
- FL Studio: Latest version
Installation
Run the appropriate installer for your operating system:
- Windows: installer.exe
- macOS: installer.app
1. If you get this message when trying to open the app:
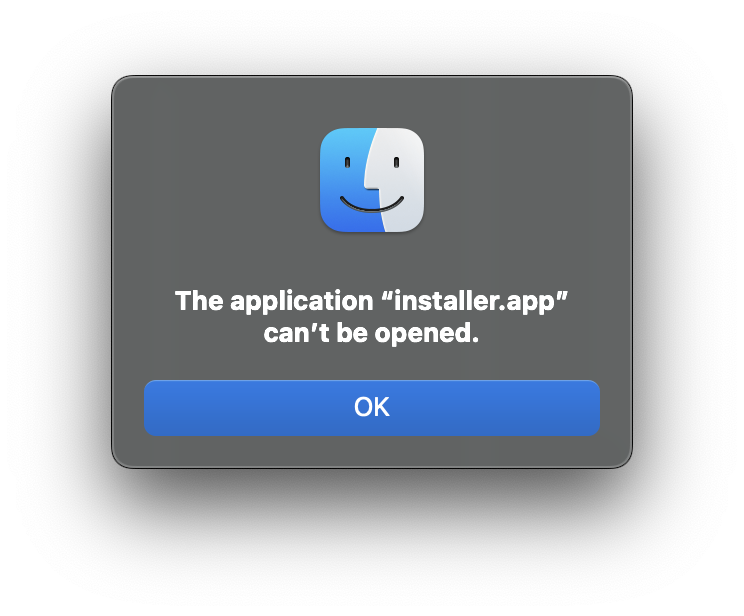
2. Then right-click the macOS folder that the app is in, select New Terminal At Folder, and type the following command into the terminal and then hit the return key:
3. Next, try to open the app again. You will see this (click Cancel):
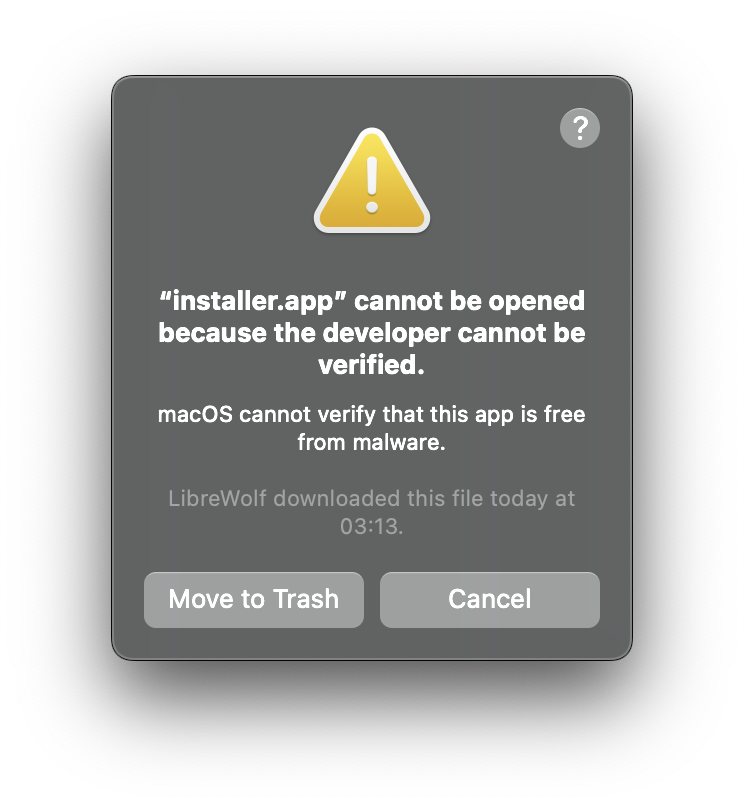
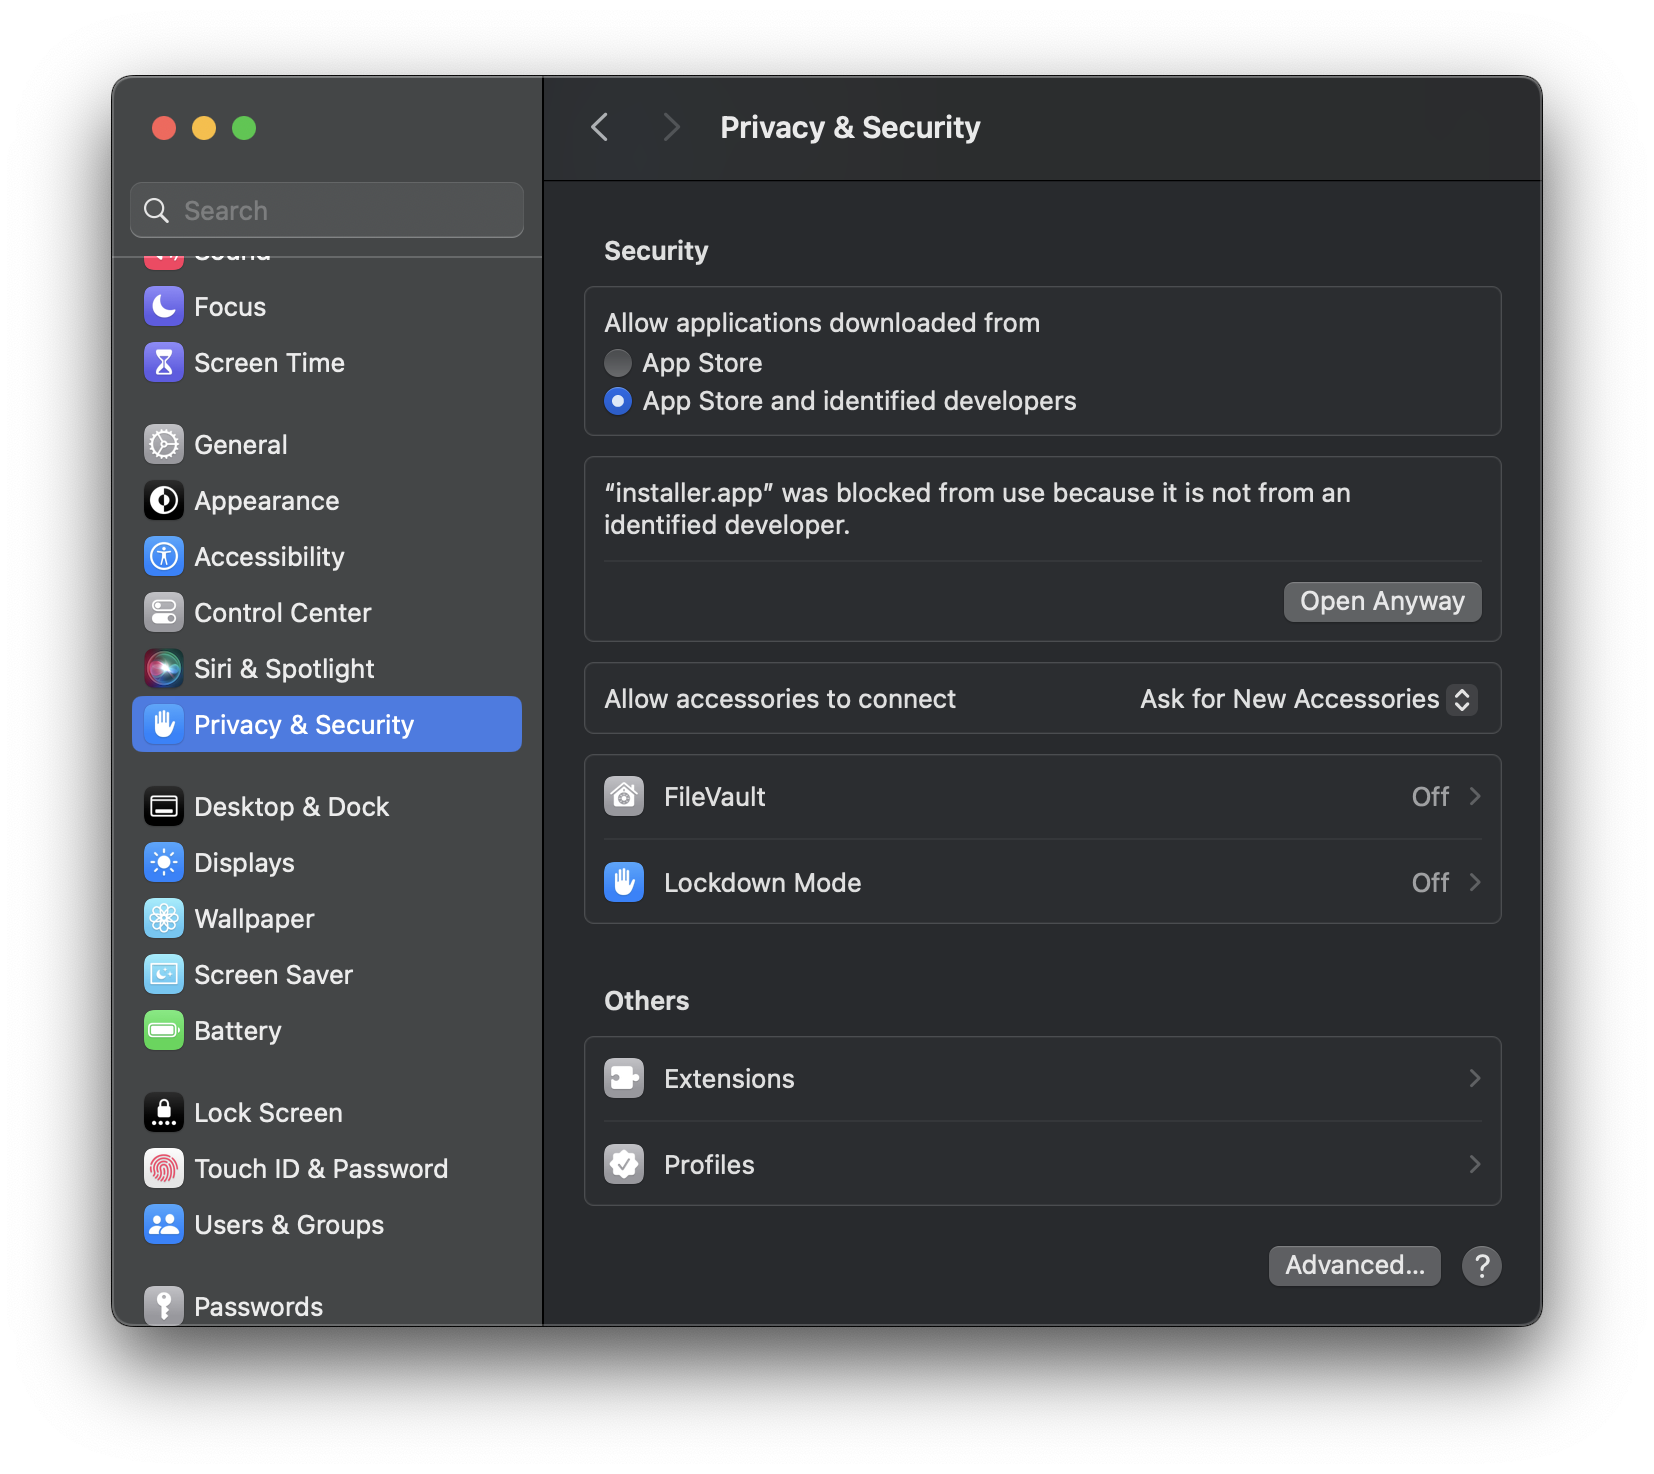
4. Go into your Security settings (scroll down) and allow the app to be opened by clicking Open Anyway:
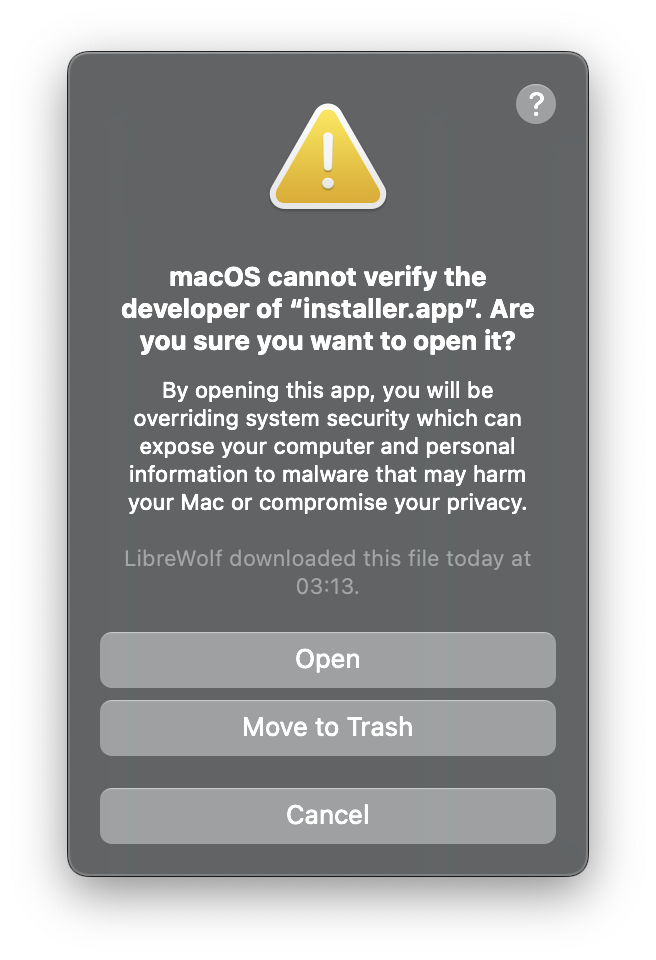
5. Finally, try to open the app again and confirm that you want to open it:
Maschine Configuration
- Connect your Maschine to your computer.
- Open FL_Studio-Maschine.ncc in Controller Editor: File > Open Configuration... > FL_Studio-Maschine.ncc
FL Studio Settings
- Make sure your Maschine is in MIDI mode. If it is not in MIDI mode, you can accomplish this by holding SHIFT and pressing the first button on your hardware unit.
- Open FL Studio, go to MIDI Settings, and enable your Maschine device.
Note: Depending on your MASCHINE Controller model and Operating System, the device selections will vary. Use the following table to find the right selection for your device:
Device Input Output MASCHINE PLUS Maschine Plus Virtual (Mac + Windows) Maschine Plus Virtual (Mac + Windows) MASCHINE MK3 Maschine MK3 Virtual Input (Mac)
Maschine MK3 Ctrl MIDI (Windows)Maschine MK3 Virtual Output (Mac)
Maschine MK3 Ctrl MIDI (Windows)MASCHINE MK2 Maschine MK2 Virtual Input (Mac)
Maschine MK2 In (Windows)Maschine MK2 Virtual Output (Mac)
Maschine MK2 Out (Windows)MASCHINE MIKRO MK3 Maschine Mikro MK3 (Mac + Windows) Maschine Mikro MK3 (Mac + Windows) MASCHINE MIKRO MK2 Maschine Mikro MK2 Input (Mac)
Maschine Mikro MK2 In (Windows)Maschine Mikro MK2 Output (Mac)
Maschine Mikro MK2 Out(Windows) - For the device you enabled in Step 2, set the "Controller type" to the following:
- For Maschine Plus/MK3/Mikro MK3: Mikey_Maschine_MK3
- For Maschine MK2/Mikro MK2: Mikey_Maschine_MK2
- For the device you enabled in Step 2, set the "Port" to a unique number. Be sure to select the same port number in the Output box and the Input box.
Quick Reference
| Operation | MK3/Plus | Mikro MK3 | MK2 | Mikro MK2 |
|---|---|---|---|---|
| Window Management | ||||
| Toggle Channel Rack | CHANNEL | SELECT + ★ | STEP | F2 |
| Toggle Selected Plugin | PLUG-IN | PLUG-IN | SELECT + STEP | SELECT + F2 |
| Toggle Playlist | ARRANGER/IDEAS | SELECT + 🔍 | ENTER | F3 |
| Toggle Mixer | MIXER or Knob1 (turn) | SELECT + ⦿ | Knob1 (turn) to open, SELECT + Encoder (push) to close | F1 |
| Toggle Browser | BROWSER | N/A | BROWSE | BROWSE |
| Toggle Plugin Picker | SELECT + BROWSER | N/A | SELECT + BROWSER | SELECT + BROWSER |
| Toggle Piano Roll | SCENE | SCENE | SCENE | SCENE |
| Close All Windows | AUTO | AUTO | AUTO | On BROWSE Page: SELECT + F1 |
| Browser Navigation | ||||
| Browser: Next Item (hold SELECT for 10x speed) | Encoder (turn right) | N/A | Encoder (turn right) | On BROWSE Page: Encoder (turn right) |
| Browser: Previous Item (hold SELECT for 10x speed) | Encoder (turn left) | N/A | Encoder (turn left) | On BROWSE Page: Encoder (turn left) |
| Browser: Ascend | Encoder (nudge up) | N/A | SELECT + Left Arrow (below Encoder) | On BROWSE Page: SELECT + F2 |
| Browser: Next Tab | Encoder (nudge right) | N/A | Right Arrow (below Encoder) | On BROWSE Page: F3 |
| Browser: Previous Tab | Encoder (nudge left) | N/A | Left Arrow (below Encoder) | On BROWSE Page: F2 |
| Browser: Select Item | Encoder (Push) | N/A | Encoder (Push) | On BROWSE Page: Encoder (push) |
| Browser: Preview Sample | SAMPLING | SAMPLING | SAMPLING | SAMPLING |
| General Controls | ||||
| Adjust Tempo | TEMPO + Encoder (turn) | TEMPO + Encoder (turn) | TEMPO + Encoder (turn) | N/A |
| Adjust Snap | LOCK + Encoder (turn) | LOCK + Encoder (turn) | N/A | N/A |
| Escape | SELECT + Encoder (Push) | N/A | SELECT + Encoder (Push) | On BROWSE Page: SELECT + Encoder (Push) |
| Copy Then Paste | DUPLICATE | DUPLICATE | DUPLICATE | DUPLICATE |
| Piano Roll & Playlist: Toggle Maximize Window | Encoder (Push) | N/A | Encoder (Push) | On BROWSE Page: Encoder (push) |
| Undo | SELECT + Pad 1 | SELECT + Pad 1 | SELECT + Pad 1 | SELECT + Pad 1 |
| Redo | SELECT + Pad 2 | SELECT + Pad 2 | SELECT + Pad 2 | SELECT + Pad 2 |
| Quantize | SELECT + Pad 5 | SELECT + Pad 5 | SELECT + Pad 5 | SELECT + Pad 5 |
| Open Edison | SELECT + SAMPLING | SELECT + SAMPLING | SELECT + SAMPLING | SELECT + SAMPLING |
| Open Context Menu | FILE | N/A | SELECT + ENTER | On BROWSE Page: F1 |
| Save Project | SELECT + FILE | N/A | N/A | N/A |
| Open Settings | SETTINGS | N/A | N/A | N/A |
| Toggle Lights | N/A | N/A | ALL | MAIN |
| Select Pattern | SELECT + Knob1 (turn) | N/A | SELECT + Knob1 (turn) | N/A |
| Create New Pattern | SELECT + PATTERN | SELECT + PATTERN | SELECT + PATTERN | SELECT + PATTERN |
| Erase Selected/All Notes (while Piano Roll is focused) | ERASE | ERASE | ERASE | ERASE |
| Toggle Pattern/Song Mode | PATTERN | PATTERN | PATTERN | PATTERN |
| Create New Pattern | SELECT + PATTERN | SELECT + PATTERN | SELECT + PATTERN | SELECT + PATTERN |
| Set/Unset Marker | EVENTS | EVENTS | SELECT + NAVIGATE | SELECT + VIEW |
| Navigate Markers | VARIATION + Encoder (turn) | VARIATION + Encoder (turn) | NAVIGATE + Encoder (turn) | VIEW + Encoder (turn) |
| Choke (kill all notes in every channel) | VARIATION + MUTE | VARIATION + MUTE | NAVIGATE + MUTE | VIEW + MUTE |
| Channel Rack Controls | ||||
| Global (except when Browser is focused): Select Channel | Encoder (nudge up/down) | N/A | N/A | N/A |
| Channel Rack: Select Channel | Encoder (turn) | N/A | Encoder (turn) | On BROWSE Page: Encoder (turn) |
| Channel Rack: Rotate Channel Steps | Encoder (nudge left/right) | N/A | Left/Right Arrow (below encoder) | N/A |
| Channel Rack: Toggle Graph Editor | Encoder (push) | N/A | Encoder (push) | On BROWSE Page: Encoder (push) |
| Adjust Channel Volume | VOLUME + Encoder (turn) | VOLUME + Encoder (turn) | VOLUME + Encoder (turn) | N/A |
| Adjust Channel Swing | SWING + Encoder (turn) | SWING + Encoder (turn) | SWING + Encoder (turn) | N/A |
| Chord Selection | ||||
| Chord: 1-3 | Button 1 | GROUP + pad 9 | Button 1 | GROUP + pad 9 |
| Chord: 1-5 | Button 2 | GROUP + pad 10 | Button 2 | GROUP + pad 10 |
| Chord: 1-3-5 | Button 3 | GROUP + pad 11 | Button 3 | GROUP + pad 11 |
| Chord: 1-3-5-7 | Button 4 | GROUP + pad 12 | Button 4 | GROUP + pad 12 |
| Chord: 1-4-5 | Button 5 | GROUP + pad 13 | Button 5 | GROUP + pad 13 |
| Chord: 1-4-7 | Button 6 | GROUP + pad 14 | Button 6 | GROUP + pad 14 |
| Chord: Octave | Button 7 | GROUP + pad 15 | Button 7 | GROUP + pad 15 |
| Chord Set Mode | Button 8 | GROUP + pad 16 | Button 8 | GROUP + pad 16 |
| Select Chord Set (while in chord set mode) | Knob 5 (turn) | Encoder (turn) | Knob 5 (turn) | Encoder (on corresponding Knob Page) |
| Chord Position | Knob 6 (turn) | 🔍 + Encoder (turn) | Knob 6 (turn) | Encoder (on corresponding Knob Page) |
| Mixer Controls | ||||
| Mixer: Select Track | Knob1 (turn) | N/A | Knob1 (turn) | On BROWSE Page: Encoder (turn) |
| Mixer: Track Volume | Knob 2 (turn) | N/A | Knob 2 (turn) | N/A |
| Mixer: Track Pan | Knob 3 (turn) | N/A | Knob 3 (turn) | N/A |
| Mixer: Track Stereo Separation | SELECT + Knob 3 (turn) | N/A | SELECT + Knob 3 (turn) | N/A |
| Mixer: Solo Selected Track | SOLO (while Mixer is focused) | SOLO (while Mixer is focused) | SOLO (while Mixer is focused) | SOLO (while Mixer is focused) |
| Mixer: Solo Selected Track (Including Sends) | VARIATION + SOLO (while Mixer is focused) | VARIATION + SOLO (while Mixer is focused) | NAVIGATE + SOLO (while Mixer is focused) | VIEW + SOLO (while Mixer is focused) |
| Mixer: Mute Selected Track | MUTE (while Mixer is focused) | MUTE (while Mixer is focused) | MUTE (while Mixer is focused) | MUTE (while Mixer is focused) |
| Cycle Effect Plugins | SELECT + Encoder (nudge up/down) | N/A | N/A | N/A |
| Pad Controls | ||||
| Select Group A-H | A-H | GROUP + pad 1-8 | A-H | GROUP + pad 1-8 |
| Pad Mode: Pad Mode | PAD MODE | PAD MODE | PAD MODE (cycle until GROUP is cyan) | PAD MODE (cycle until GROUP is cyan) |
| Pad Mode: Omni Preview Mode | PAD MODE (while already in Pad Mode) | PAD MODE (while already in Pad Mode) | SELECT + PAD MODE | SELECT + PAD MODE |
| Pad Mode: Toggle Mute Mode | SELECT + MUTE (while in Pad Mode) | SELECT + MUTE (while in Pad Mode) | SELECT + MUTE (while in Pad Mode) | SELECT + MUTE (while in Pad Mode) |
| Pad Mode: Toggle Solo Mode | SELECT + SOLO (while in Pad Mode) | SELECT + SOLO (while in Pad Mode) | SELECT + SOLO (while in Pad Mode) | SELECT + SOLO (while in Pad Mode) |
| Pad Mode: Keyboard Mode | KEYBOARD | KEYBOARD | PAD MODE (cycle until GROUP is blue) | PAD MODE (cycle until GROUP is blue) |
| Pad Mode: Chord Mode | CHORDS | CHORDS | PAD MODE (cycle until GROUP is plum) | PAD MODE (cycle until GROUP is plum) |
| Pad Mode: Step Mode | STEP | STEP | PAD MODE (cycle until GROUP is orange) | PAD MODE (cycle until GROUP is orange) |
| Pad Mode: FX Mode | PERFORM | PERFORM | NAVIGATE + PAD MODE | VIEW + PAD MODE |
| Toggle Pad Sensitivity | MACRO | Push Encoder | CONTROL | CONTROL |
| Toggle Fixed Velocity | FIXED VEL | FIXED VEL | Knob 4 (turn; on when above 0) | Encoder (on corresponding Knob Page; on when above 0) |
| Set Fixed Velocity Value | Knob 4 (turn) | N/A (only full velocity) | Knob 4 (turn) | Encoder (on corresponding Knob Page; push to toggle OFF/FULL) |
| Set Number of Velocity Levels | SELECT + Knob 4 (turn) | N/A | SELECT + Knob 4 (turn) | SELECT + Encoder (turn), while on corresponding Knob Page |
| Select Scale (when not in chord set mode) | Knob 5 (turn) | Encoder (turn) | Knob 5 (turn) | Encoder (Knob Page 1) |
| Set Octave | Knob 7 (turn) | ⦿ + Encder (turn) | Knob 7 (turn) or Left/Right (TRANSPORT section) | Left/Right (TRANSPORT section) |
| Set Semitone | Knob 8 (turn) | ★ + Encoder (turn) | Knob 8 (turn) | Encoder (Knob Page 4; push to reset) |
| Hint Panel: View Current Scale | Knob 5 (touch) | Select Scale | Select Scale | Select Scale |
| Hint Panel: View Current Key | Knob 8 (touch) | Set Semitone | Set Semitone | Set Semitone |
| Pad Mode: Latch/Unlatch Custom Note | NOTE REPEAT + pad | NOTE REPEAT + pad | NOTE REPEAT + pad | NOTE REPEAT + pad |
| Touch Strip | ||||
| Touch Strip: Toggle Pitch Mode | PITCH | PITCH | N/A | N/A |
| Touch Strip: Toggle Mod Mode | MOD | MOD | N/A | N/A |
| Touch Strip: Toggle Notes Mode | NOTES | NOTES | N/A | N/A |
| Touch Strip: Toggle Pad Filtering | SELECT + NOTES | SELECT + NOTES | N/A | N/A |
| Touch Strip: Song Position Mode | Toggle Pitch/Mod/Notes mode off | Toggle Pitch/Mod/Notes mode off | N/A | N/A |
| Transport Controls | ||||
| Transport: Toggle Loop Recording | SELECT + RESTART | SELECT + RESTART | SELECT + RESTART | SELECT + RESTART |
| Transport: Restart | RESTART | RESTART | RESTART | RESTART |
| Transport: Play | PLAY | PLAY | PLAY (when stopped) | PLAY (when stopped) |
| Transport: Stop | STOP | STOP | PLAY (when playing) | PLAY (when playing) |
| Transport: Record | REC | REC | REC | REC |
| Toggle Record Count-In | SELECT + REC | SELECT + REC | SELECT + REC | SELECT + REC |
| Toggle Metronome | FOLLOW | FOLLOW | GRID | GRID |
| Tap Tempo | TAP | TAP | N/A | N/A |
Pad Modes
Pad Mode
- Maschine will start in Pad Mode by default.
- To switch to Pad Mode:
- Plus/MK3/Mikro MK3: Press PAD MODE
- MK2/Mikro MK2: Press PAD MODE, repeating until the GROUP button turns cyan (light blue).
- Pad Mode allows you to select between the channels in the channel rack by pressing a pad.
- You can select between 128 channels:
- Group A: channels 1-16
- Group B: channels 17-32
- Group C: channels 33-48
- Group D: channels 49-64
- Group E: channels 65-80
- Group F: channels 81-96
- Group G: channels 97-112
- Group H: channels 113-128
- Only pads with corresponding channels are lit. On the Maschine MK3 and Plus, the right screen indicates which pads have channels by filling the color white (even if the channel is muted).
- The pad corresponding to the selected channel is highlighted.
- Pads flash when pressed.
- While FL Studio is in Pattern mode, pads flash during playback to indicate channel step activity.
- When you press a pad, the selected instrument will be automatically auditioned (played back) at C5.
- To set a pad to audition at a custom note (instead of the default C5), adjust the OCTAVE and SEMITONE until the pad plays back the desired note; then hold NOTE REPEAT and press the pad to latch in this desired note. Once this is done, the pad will not respond to changes in OCTAVE or SEMITONE until it is reset.
- To reset a pad back to auditioning the default C5, hold NOTE REPEAT and press the pad.
- You can customize the color of each pad. This is useful for grouping similar instruments or for indicating that you have latched a note to a pad. Changing the pad color also changes the color of the corresponding channel. This allows pad colors to be saved along with the FL Studio project. To change the color of a pad:
- Plus/MK3/Mikro MK3: VARIATION + pad (repeat until desired color is set)
- MK2: NAVIGATE + pad (repeat until desired color is set)
- Mikro MK2: VIEW + pad (repeat until desired color is set)
Note: Also hold the SELECT button to reset the color. - While in Pad Mode, you can enter Mute Mode or Solo Mode by holding SELECT and pressing MUTE or SOLO, respectively. In these modes, channels can be muted/soloed on the fly. This can be recorded as events. To return to normal Pad Mode, use the same button combination.
Omni Preview Mode
- To switch to Omni Preview Mode:
- Plus/MK3/Mikro MK3: Press PAD MODE while already in Pad Mode
- MK2/Mikro MK2: Hold SELECT and press PAD MODE
- Omni Preview Mode allows you to play between all channels directly on the Channel rack without changing channel selection.
- To play in Omni Preview Mode: In FL Studio's MIDI Settings, set "Omni preview MIDI channel" to 16.
- You can select between 121 channels:
- Group A: channels 1-16
- Group B: channels 17-32
- Group C: channels 33-48
- Group D: channels 49-64
- Group E: channels 65-80
- Group F: channels 81-96
- Group G: channels 97-112
- Group H: channels 113-121
- Only pads with corresponding channels are lit. On the Maschine MK3 and Plus, the right screen indicates which pads have channels by filling the color white (even if the channel is muted).
- Pads flash when pressed.
- When you press a pad, the corresponding instrument will be played back at C5.
- You can customize the color of each pad. This is useful for grouping similar instruments or for indicating that you have latched a note to a pad. Changing the pad color also changes the color of the corresponding channel. This allows pad colors to be saved along with the FL Studio project. To change the color of a pad:
- Plus/MK3/Mikro MK3: VARIATION + pad (repeat until desired color is set)
- MK2: NAVIGATE + pad (repeat until desired color is set)
- Mikro MK2: VIEW + pad (repeat until desired color is set)
Note: Also hold the SELECT button to reset the color.
Keyboard Mode
- To switch to Keyboard Mode:
- Plus/MK3/Mikro MK3: Press KEYBOARD
- MK2/Mikro MK2: Press PAD MODE, repeating until the GROUP button turns blue.
- Keyboard Mode allows you to play individual notes.
- The default scale is chromatic.
- There are 8 Groups of scales. Each Group contains 16 scales. The first 15 scales in each Group are built-in scales featured in Maschine Software. The 16th scale is a customizable scale. The pads display a checkered pattern for custom scales.
- The pad lights match the selected scale by highlighting each occurrence of the root note of the scale (just like in Maschine Software).
- The key of the selected scale can be adjusted by setting the Semitone (range: -12 to +12).
- The octave of the selected scale can be adjusted by setting the Octave (range: -3 to 3).
- When you adjust the scale, octave, or semitone, the Hint Panel displays the corresponding status.
- You can define custom scales by using the included generator app.
- Each pad responds to your VELOCITY settings.
Chord Mode
- To switch to Chord Mode:
- Plus/MK3/Mikro MK3: Press CHORDS
- MK2/Mikro MK2: Press PAD MODE, repeating until the GROUP button turns plum.
- Chord Mode allows you to play chords in harmony with the selected scale. All scales and harmony types from Maschine Software are included.
- You can play various chord inversions by setting the POSITION knob.
- Chord Mode also allows you to play chord sets (see the Quick Reference chapter for details on how to enter chord set mode and select chord sets).
- There are 8 Groups of chord sets. The first 7 Groups contain a library of over 100 included chord sets. The last Group contains 16 empty chord sets that you can customize (up to 256 custom chords).
- You can define custom chord sets by using the included generator app.
- The chord detection algorithm displays the chord name in the hint panel.
- Each pad responds to your VELOCITY settings.
- All scale adjustments that apply in Keyboard Mode also apply in Chord Mode.
Step Mode
- To switch to Step Mode:
- Plus/MK3/Mikro MK3: Press STEP
- MK2/Mikro MK2: Press PAD MODE, repeating until the GROUP button turns orange.
- Step Mode allows you to program the step sequencer for each channel in the channel rack.
- By switching between groups, you can program up to 128 steps on each channel.
- The pads reflect the state of the steps for the selected channel.
- While FL Studio is in Pattern mode, the pads flash to track the current step during playback. For non-Mikro Maschines, the Group buttons also flash to the beat to track the current group of steps.
- For non-Mikro Maschines, there is a second Knob Page that can be used to control 8 step parameters of each step:
- Note pitch: This parameter sets the MIDI note of the step. Enable the corresponding "Snap to Scale" button to snap to MIDI notes of the currently selected SCALE. This is useful for creating unique arpeggios.
- Velocity: This parameter sets the velocity of the step. Press the corresponding "Reset Velocity" button to reset the velocity of the step to 100.
- Release velocity: This parameter sets the release velocity of the step. This is not a commonly supported parameter. Sytrus does support this. Press the corresponding "Reset Release" button to reset the release velocity of the step to 50%.
- Fine pitch: This parameter sets the fine pitch of the step. This is useful for creative detuning. Press the corresponding "High Range" button to toggle between positive and negative pitch values.
- Panning: This parameter sets the pan of the step leftward, rightward or center. Press the corresponding "Reset Panning" button to reset the pan to center. Note: Since the MIDI protocol only supports 128 values, this parameter cannot be panned 100% left or right from the hardware control, but it can get extremely close (98.4%). Note: This parameter only applies to Sampler channels.
- Mod X: This parameter sets the filter cutoff frequency applied to the step. Press the corresponding "High Range" button to extend the available range of values. Press the "Filter Type" button to cycle through the various channel filter types. Note: This parameter only applies to Sampler channels.
- Mod Y: This parameter sets the filter resonance applied to the step. Press the corresponding "High Range" button to extend the available range of values. Press the "Filter Type" button to cycle through the various channel filter types. Note: This parameter only applies to Sampler channels.
- Shift: This parameter applies a positive time offset (slight delay) to the step. This is useful for creatively varying the timing of a step. Note: Pad Mode step activity lighting does not account for any applied time offset.
FX Mode
- To switch to FX Mode:
- Plus/MK3/Mikro MK3: Press PERFORM
- MK2: Press NAVIGATE + PAD MODE
- Mikro MK2: Press VIEW + PAD MODE
- FX Mode allows you to assign Mixer tracks to the selected channel on the fly. This is useful for automating effect changes.
- Each pad corresponds to a Mixer track number. The last 3 pads of the last Group correspond to the Master track.
- The pad corresponding to the selected channel's assigned track number is highlighted.
Groups
Group Definitions
Groups are directly tied to pad modes. Groups have a different meaning depending on which pad mode is currently active:
- Pad Mode / Omni Preview Mode: Groups correspond to sets of 16 channels.
- Keyboard Mode: Groups correspond to banks of scales.
- Group A: Main
- Group B: Modes
- Group C: Jazz
- Group D: World
- Group E: Fivetone
- Group F: Modern
- Group G: Major
- Group H: Minor
- Chord Mode: Chord Mode is composed of two sub modes – Harmonizer Mode and Chord Set Mode.
- Harmonizer Mode: This mode is active when not in Chord Set Mode. Groups correspond to banks of scales.
- Group A: Main
- Group B: Modes
- Group C: Jazz
- Group D: World
- Group E: Fivetone
- Group F: Modern
- Group G: Major
- Group H: Minor
- Chord Set Mode: This mode is active when not in Harmonizer Mode. Groups correspond to banks of chord sets. Each bank is loosely/subjectively categorized by genre. The last group is a custom bank which is left empty for customization.
- Group A: R&B
- Group B: Rock
- Group C: Jazz
- Group D: Latin
- Group E: Classical
- Group F: Dance
- Group G: Folk
- Group H: Custom
- Harmonizer Mode: This mode is active when not in Chord Set Mode. Groups correspond to banks of scales.
- Step Mode: Groups correspond to sets of 16 steps in the channel rack step sequencer.
- FX Mode: Groups correspond to sets of 16 Mixer tracks. Since there are 125 total Mixer tracks, the last three pads of the last Group map to the Master track.
Switching Groups
The Maschine non-Mikro variants have dedicated Group buttons, labeled "A" through "H". For these units, switching groups is straightforward – simply press the button for the group you want to switch to.
The Maschine Mikro variants do not have dedicated Group buttons – they have a single GROUP button. To switch groups on these units, hold the GROUP button and select the pad corresponding to the group you want to switch to. Pads 1 through 8 correspond to Groups A through H, respectively.
You will notice on the Maschine Mikro variants that holding GROUP will cause the color of the pads to change. The color of the first 8 pads indicate the current pad mode, and the color of the second set of 8 pads are green (with the exception of the last pad for chord set mode). The first 8 pads serve as group buttons. The pad corresponding to the active group is highlighted. The second set of 8 pads corresponds to Chord Mode buttons (since these units do not have the dedicated 8 buttons at the top). The pad corresponding to the active sub mode of Chord Mode is highlighted.
Custom Chords & Scales
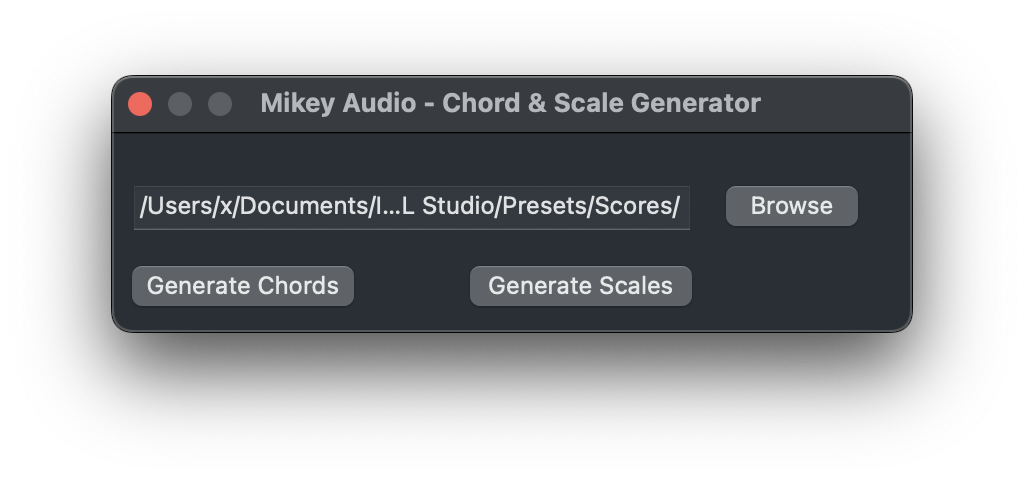
- Custom chord sets and custom scales can be configured using the included generator app.
- The generator app reads chords and scales from MIDI files and saves them in a format suitable for use with Maschine and FL Studio.
- Use FL Studio's Piano Roll to create a chord set by painting in up to 16 chords consecutively, and then export a .mid file. To create a scale, paint up to 16 notes consecutively and then export.
- MIDI files for chord sets must be named c1.mid, c2.mid, ... c16.mid.
- MIDI files for scales must be named s1.mid, s2.mid, ... s16.mid.
- Point the generator app to the folder containing your MIDI files by using the Browse button or by typing the path in the edit box.
- Click "Generate Chord" or "Generate Scales" to save your new chord sets or scales. Restart FL Studio for the changes to take place.
- Custom chord sets will be found in Group H while in Chord Set Mode. Custom scales will be found as the last scale in each Group.
- Custom scales don't necessarily have to be melodic. They can be used to map pad note assignments to your favorite drum plugins.
- To reset custom chord sets or custom scales back to factory defaults, leave the edit box empty and click the respective Generate button.

Touch Strip
Pitch Mode
Pitch Mode allows the touch strip to serve as a pitchwheel, controlling the channel pitch.
Mod Mode
Mod Mode allows the touch strip to serve as a mod wheel.
Your project must include a properly configured "Remote control":
- Locate the Remote control for the Mod wheel in the Browser PROJECT tab:
Current Project → Remote control → Omni - Mod wheel (Wrapper) - In the "Remote control settings" window:
- Click the "Link 1" dropdown then click "New link".
- Set "Port" to the port number you chose in Step 4 of Setup - FL Studio Settings.
- Set "Channel" to 1
- Set "Ctrl" to 1
- Select "Omni"
- Click "Accept"
- Your new "Remote control" will appear in the Browser. I recommend creating a project template at this point to avoid repeating these steps for each new project.
Notes Mode
Notes Mode allows the touch strip to play notes and chords. The velocity at which these notes and chords are played are determined by your fixed velocity settings. Playing notes and chords with the touch strip responds to the sustain pedal. When Pad Filtering is enabled (SELECT + NOTES), pads do not trigger any sound, and the touch strip will only play notes/chords corresponding to the pads that are pressed.
Position Mode
Position Mode allows you to seek through the Pattern/Song position. The lights above the touch strip indicate the current Pattern/Song position.
Pad Sensitivity
Trigger Threshold
Maschine's pads tend to be less sensitive in MIDI mode than when it is used with Maschine Software. To address this, a workaround is included that reinterpets aftertouch MIDI data as MIDI note-on data. This lowers the pad trigger threshold, resulting in significantly improved playability when playing a melodic instrument. This also allows you to re-trigger a pad without letting go of it. I recommend enabling this feature for melodic instruments and disabling it for drums. When this feature is enabled, aftertouch is disabled. See Toggle Pad Sensitivity.
Velocity Curve
Velocity Curve refers to the mapping of applied pressure to output velocity. This can be configured in Controller Editor's "Pad Velocity Curve" setting on the "Templates" tab, which offers 7 different velocity curves. Controller Editor also offers a "Sensitivity" slider in the Preferences.
Velocity Levels
The non-Mikro Maschines have a feature that allows you to reduce the number of velocity levels. By default, there are 128 velocity levels. This default corresponds to the value 0. Each time you increment the value, the number of velocity levels splits in half. The value can range from 0 to 7. At 7, there is only one velocity level, which is the same as fixed full velocity. To change this value, hold SELECT and turn the VELOCITY knob.
